July 23, 2015

Little Book Review + Soaking & Sprouting Nuts & Seeds

My latest favorite library find: DIY Nut Milks, Nut Butters & More by Melissa King.
I want to devour this whole book!  It goes far beyond your basic almond milk or peanut butter.
It got me in the kitchen making my own nut & seed milks.  (The winner? My own blend of soaked almonds & sunflowers, which made for an extra-creamy, flavorful refresher!)
 There are lots of beautiful dishes using the basic milk & butter recipes, many of them no-bake; perfect for summer! (the White Chocolate Coconut Fudge looks utterly to-die-for.)  These are decadent but doable, as well as totally good for you! 


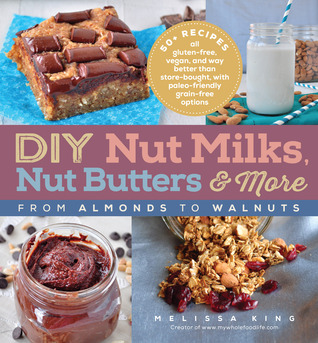
Each recipe is vegan and gluten free. Most importantly, all are recipes which use pure, whole foods.  
I especially appreciate the chapter with ideas for using up the nut pulp usually leftover from making nut milk, which was something I'd had a hard time utilizing before. It ended up in the compost a few times, which seemed a terrible waste of food, so I quit making nut milks. Not anymore!
I love the large variety of ideas in this compact book. Definitely the best book on the subject that I have yet seen. 

A bit About Soaked Almonds
I've talked about these here before. When almonds (and other nuts & seeds) are soaked, the enzymes that aid in their digestion are released. The nutrients, many of which are essentially dormant in the unsoaked state, are made more available for our use. 
Also, most nuts and seeds, when unsoaked, are acidifying to the body; a soaked nut or seed has the opposite effect.

Soaking is a gentle process which does nothing to damage the good things of the nut, things like selenium and Vitamin E, and optimizes them for quicker absorption into the body.    
We don't have to try as hard to digest a soaked almond, and so, they are a quick source of energy.  I can't get over the feeling of instant alertness that comes over me every time I eat them (or drink them!).
Unlike sprouting seeds and nuts, which can take days, soaking takes only an overnight dip in water to uncover all these health benefits. 
I think that everyone should try their hands at this process; it's so easy to do and takes very little time. 
There is no set recipe: just place 1 cup of your favorite nut or seed in a bowl and fill with water to cover by at least one inch (almonds especially expand many times over during the soaking process) and let them soak overnight. (See my tips on how to store these without refrigeration) Once soaked & drained, they can be eaten as is or blended with fresh, cold water & strained to make milk. 
Give them a try & let me know what you think!    

June 11, 2015

Strawberry-Orange Kefir Smoothie


Kefir is relatively new to me. In fact, being mostly vegan for the past several years, the whole idea of consuming any dairy at all is new. I've been trying lately to eat for better health, and an honest look at my health showed that there is definitely room for improvement. The vegan diet was not giving me the vibrant feeling it once did. That is, in large part, due to heavy phytic acid build up from unsoaked/unsprouted grains, but that is a post for another time. In this post, I want to focus on kefir and its many health benefits.

Recently, I picked up a copy of Cultured Food Life by Donna Schwenk at my local library and began reading about kefir. 

I highly recommend this book to anyone interested in fermented foods. It's loaded with information without being too technical, and makes DIY cultures fun and approachable. 

Fermented foods are powerful aids for improving health in general, and for that reason I have been making home brewed kombucha for my family. (It's easy to culture from a store-bought bottle.)

 However, according to the book, fermented foods are much more effective when the different types are consumed together.  The huge list of  potential benefits kefir can have convinced me to try it, in addition to my kombucha, and see for myself.

I can say without a doubt that I feel pretty great since kefir entered my life. 

The taste is that of yogurt, but stronger, with a more pronounced tang. The texture is like a thin yogurt.
 It took me some getting used-to, and I still don't drink it straight, but it is perfect as an ingredient.

 At first glance, it looked kind of weird on the shelf when I found it at a local health food place; it had separated and had clear liquid on top; but I quickly got over my unnecessary squeamishness, because separation means that it was not homogenized (and thus, minimally processed).  
I was thrilled to see that it also was organic, grass fed and raw. (There are benefits known only to raw dairy that are lost with pasteurization.) 
Being so whole and unprocessed naturally provides the maximum amount of health benefits.  


Originally this was going to be just a typical all-fruit smoothie for breakfast, but I was hungry and feeling the need for something with a little more heft.  I wanted to get some kefir culture in me and thought the flavor of it would be well concealed within the berry-orange mixture. It worked! 
The perfect breakfast or post-workout drink. 

This recipe makes a lot, maybe five servings, but it's so delicious I didn't have much trouble consuming most of it! (I did have some help.) 
Any extra berry mixture could be frozen; it would make excellent sorbet or ice pops. 


Strawberry-Orange Kefir Smoothie
_________________________________
1 (16 oz.) package strawberries, about 2 cups
2 oranges
1 cup ice
1/2 cup kefir per drink
------------------------------------------
Wash & trim berries; slice in half. Place
in blender. Juice the oranges and add juice to berries.
Puree briefly until some chunks still remain.
Add ice to berry mixture; blend until frothy, just until no ice chunks remain.
To serve, pour mixture into 8 oz. glasses, filling half way. 


Top each glass with 1/2 cup kefir. 
Stir until combined and enjoy!     

An original recipe from http://anyfig.blogspot.com/  :)

January 29, 2015

Our First Duck Eggs & other signs of spring


Our Muscovy duck began laying eggs early this month, and has continued to lay for weeks. It has been a complete surprise, considering we had thought her to be a male!
  I think that the eggs are just the most beautiful things in the world. They never cease to amaze me. Each day, we gather a new egg, and I can't help but marvel at every little spot and speckle. Each one just seems miraculous. Every day, I am reminded to be grateful; every day is a precious gift.

Spring is just around the corner, and the eggs aren't the only sign: the Meyer lemon is blossoming, as well as the violets; the Anna apple is budding, and the rosemary is flowering (the best time to harvest some branches for drying).


December 18, 2014

Cranberry Lemon Muffins


It's been a long time since I've been this excited over a baking recipe.
A simple ingredient list and easy mixing by hand really makes this recipe appealing, and since I have a definite affinity for both cranberries and lemons, I was smitten with these from the first bite.   
These muffins are bursting with bright lemon flavor thanks to a generous helping of fresh lemon zest, and every bite is kissed with tangy, fresh cranberries. 
The coconut flour gives these an incredibly delicious, slightly nutty background flavor and adds to the overall sweetness of these. My latest favorite flour, it adds depth to any recipe it graces.  


Slicing the cranberries in half takes some time, but don't let that deter you from making these muffins.
Trust me, they are worth it. 

I used Pacific Northwest - grown cranberries, which, here in California, are definitely fresher than their Eastern counterparts. The recipe actually came from the bag; I adapted it, switching flours, and replacing margarine, milk, and refined sugar with less-processed ingredients.

The result is a moist, tender muffin that I can feel good about eating.

Try these with tea.   


This recipe makes a very thick batter. I used an ice cream scoop to portion out the dough between 12 muffin cups. 


Cranberry Lemon Muffins
_____________________________

2 cups fresh cranberries
1/2 cup almond milk
1 cup evaporated cane sugar
1/4 cup coconut oil, softened
1/4 tsp sea salt
2 eggs
Zest of one large lemon
1/2 tsp vanilla extract
2 cups spelt flour, minus 1/8 cup
1/8 cup coconut flour
2 tsp baking powder

Before you do anything, slice the cranberries in half, then set them aside.

Heat oven to 350 F.

In a large bowl, mix sugar, salt, oil, eggs, and milk. Zest the lemon over the bowl, add vanilla, and stir.

In a smaller bowl, whisk the flours and baking powder together.

Add to the wet ingredients and stir until smooth.

Fold in the sliced cranberries.

Divide batter evenly between 12 paper-lined muffin cups. 

Bake 25 minutes, or until slightly golden at edges and a toothpick comes out clean from the center of  the muffins.

Let cool and eat the same day for the freshest taste.      

Recipe adapted from HBF International Northwest Fresh Cranberries.

December 1, 2014

Persimmon + Ginger Kombucha


This honey-gold brew is especially delicious this time of year. 
It combines the taste of a ginger beer with that of the buttery-sweet persimmons
to make a slightly fizzy, balanced beverage that is neither too sweet nor too tart. 


Finally, a good use for overripe persimmons; in fact, the softer the better for this recipe.


The ducks are always interested in what we're eating, even kombucha!


Depending on how ripe your persimmons are, you may be able to just remove the stem at the top and put the soft fruit into the kombucha to infuse as is. 


[Below: Ducky was very interested in the bag of persimmons, and persisted his begging until we gave him a piece of one, which he wasn't thrilled with. The girls were more interested in the delights the flat of calendulas had to offer them.
  

Coco's big eyes widen at the sighting of a particularly juicy-looking slug: ]
Aren't her petite little tootsies just adorable!?


This was my first attempt at infusing kombucha, using my very first home-brewed batch. 
It turned out so much better than I'd hoped - a raging success. I can't really believe it!


Quality ginger-root is key here.

Look for the smaller, golden-fleshed roots that have been showing up recently in health food markets; these are grown in Peru and are far more potent than their larger, grown-in-China counterparts. Of course, homegrown would be far superior to any roots you could buy.  


Persimmon + Ginger Kombucha
________________________________

You will need 1 1/2 cups of diced fruit and a roughly 1-inch length of thinly-sliced, unpeeled fresh ginger root for every half-gallon of kombucha you plan to infuse.

Start with plain homebrewed kombucha that is finished fermenting to your taste.

Brew a fresh batch of sweetened tea for your SCOBY.

Set aside one cup plain finished tea for inocculating the new tea.

The rest of the finished kombucha can be infused.

To infuse, place the kombucha into a clean jar and add the diced fruit and ginger.

    Let this infuse for about three days, or to taste. The finished brew should be slightly effervescent and a beautiful deep golden-orange color.

This can be sipped as is, or, for more carbonation, bottle and refrigerate for a day or two, until the desired amount of bubbles is reached.

November 28, 2014

Giving Thanks


(Just pasting this code so I can claim my blog over on Bloglovin'.

<a href="http://www.bloglovin.com/blog/11797451/?claim=e5gt3933gus">Follow my blog with Bloglovin</a>
_________________________________________________________________________________

Above is a pic from our Thanksgiving.  Our own homegrown calamondin limes and juice from local tangerines freshly squeezed that morning went into the cranberry sauce. It was a good day.

October 14, 2014

Rustic Pear Tart


Tart as in cake topped with fruit and baked, not the filled crust-type tart. This is more of a European terminology for any kind of cake or pastry with fruit. The rustic kind of tart.


Home grown bartlett pears graced this tart, and homemade apricot nectar gave it the finishing touch. 
(See my recipe for Homemade Apricot Nectar here ).

This is a sturdy, wholesome dessert; a no-fuss recipe which is very easy to put together.

The simple preparation lets the pure flavor of pears shine through.       


 Be sure to use a springform pan (see note below) as it allows for more room that a typical cake pan and helps to keep the tart from crumbling.


Rustic Pear Tart

_________________________________

1/2 cup (1 stick) organic butter
Juice of 1/2 a lemon, devided
 1 pound firm-ripe pears, cored and sliced 1/2-inch thick 
1 cup spelt flour
1 tsp baking powder
1/8 tsp sea salt
1 cup natural cane sugar
2 eggs
1 tsp vanilla extract
 Apricot jam, for glazing (optional) 

Butter a 9-inch springform pan* and set aside.
 Squeeze half of the lemon juice over the sliced pears.
In a small bowl, whisk together flour, salt, & baking powder.
With a mixer, cream the butter and sugar for about 3 minutes, until light and fluffy.
Beat in the eggs, one at a time, and then the vanilla.
Add the dry ingredients and stir until just combined.
Spread batter in the prepared pan, smoothing to the edges.
Wrap and chill in fridge for 20 minutes.

Heat oven to 375 F.
Arrange the pear slices on top of the chilled batter in concentric circles, or any way that pleases the eye, so long as there is a single layer (slices will overlap slightly).
Bake 45-55 minutes, until edges are just golden and center is set; do not overbake.
Cool in pan 10 minutes, then remove from pan to a wire rack.
While tart is still warm, glaze with the jam, if desired. (A pastry brush works well for this.)   
 Slice & serve.

* if pan is non-stick, line buttered pan with parchment and then butter the parchment. This is a good way to protect food from exposure to the Teflon-laced nonstick coating, in the absence of a stainless steel pan.  

August 31, 2014

A Wishlist of Books

From favorite bloggers, foodies, homesteaders, foragers, artisans, publishers... and a few new faces, 60 enticing reads I can't wait to get my hands on.

August 1, 2014

Our first forays into dehydrating


Recently, we've been up to our elbows in delicious, local fruit. Many neighbors have offered us a share of their beautiful fruit trees' harvests.  Besides devouring fresh fruit, and canning a little bit, we've dehydrated.

Dehydrating does an excellent job of reducing the bulk and weight of produce, without destroying nutrients, as cooking can.  And, I was quite surprised to see it; home-dehydrated fruit keeps its color beautifully, without anything at all added to preserve it.

 When there's just not enough time in the day to can it all, it's time to break out the dehydrator.  Ours is an old model, very 80's with it's wood-look exterior, quite roomy and in mint condition.

In contrast to canning, the whole process was very meditative. It was just chopping the fruit, placing it carefully spaced on the trays, and flipping the switch to "on". 
  After that, just let the machine hum quietly the next day or two, until the produce is fully dry; it'll be either crisp and snap when bent, or leathery, depending on the type of fruit.
   Apples, peaches, and oranges were crisp, where plums, bananas, and grapes stayed leathery.


Dehydrating food may not be as glamorous as putting up jewel-colored, canned preserves, but nevertheless is an exceptional way to store food for the long term safely.      

Anyone can do this; it's just so easy. The key is to get the freshest produce, then follow these steps:      


First, start on a warm, dry day (this will help speed the process). 

Gather the best produce you can find.    


Apples, grapes, oranges,


                                                    plums, and peaches all work well.


Slice, place on dehydrator racks, and set machine to run.

 After fully dry, store the bounty, in glass or pottery (plastic will flavor the food) and enjoy the peace of mind that comes with preserving quality food.


Further reading: see Mary Bell's Complete Dehydrator Cookbook ,


July 9, 2014

Pickled Jalepenos


These are also known as vegetables en escabeche; marinated, basically. 
Pickled jalepenos are a particular favorite of mine; I've been known to eat almost a whole can of them in a day.  They go with everything.
Adding the brine is my secret to incredible guacamole!  


As a variation, you can mix & match vegetables; I combined carrots with the jalepenos to make pickles just like the ones that we get from a local taco place. They're truly addictive!  


This takes up so little time from start to finish; it's the perfect pickling project for beginners and busy, busy people alike.

PICKLED JALEPENOS

1 1/2 cups white wine vinegar
1 1/2 cups water
2 tablespoons pink salt
1/2 teaspoon celery seed
2 teaspoons cumin seed
2 teaspoon coriander seeds, crushed
2 teaspoons black peppercorns
2 teaspoons dried oregano
1 large bay leaf
2 cloves garlic, sliced
8 or more large jalepenos, sliced into 1/4-inch rounds -
   as many as needed to fill the jar to within 1 inch of the top.

Combine water, vinegar, salt, the celery, cumin, and coriander seeds, the peppercorns, and the oregano in a small saucepan and bring to a boil.
While the brine comes to a boil, pack the jalepenos into a quart jar, and place the garlic evenly distributed throughout. Add the bay leaf.
Pour the hot brine into the filled jar, covering the jalepenos completely. Let cool to room temperature, cap the jar, and then refrigerate for at least one week to allow the flavors to fully develop.
These only get better with time, but they're so delicious, they don't last.

Adapted slightly from It's All Good by Gwyneth Paltrow        

May 1, 2014

Chocolate Pudding


Rich, glossy & sumptuous, this incredible pudding is made with only a handful of ingredients and it couldn't be easier to prepare. 


The recipe this is based off of called for ingredients to be thrown in the food processor, which I don't have. So I tried using the blender, which didn't get me anywhere. 

It's much easier to do this by hand than to use the blender. The key is to completely mash the avocado before adding the other ingredients. After that, just whip it up & try not to eat it all!

Who knew that avocado could be turned into such a silky, luxurious treat?
The avocados - any kind will work - should be really, really ripe for the best texture; in fact, this would make excellent use of slightly overripe avocados.

I used saguaro honey (continuing the "what grows together goes together" theme), but any kind would be good.  A 50/50 mix of regular and Dutch-process cocoa was used for this, but either would be fine. 

Try adding a drop of almond extract along with the vanilla for a variation. It's amazing.

Chocolate Pudding

2 large avocados
5 Tablespoons cocoa powder   
1/4 cup honey
2 teaspoons vanilla extract
Splash of almond milk

Fully mash the peeled avocados; whisk to remove any lumps.
Add the rest of the ingredients, and whisk until thoroughly combined.
Pudding should be uniformly colored, and it'll be quite thick.
(Extra almond milk can be added to thin it down if needed.)
Makes enough for two.
Refrigerate any leftovers.
Leftovers. Like that's gonna happen!

an *anyfig.blogspot.com* recipe; adapted
 from a Whole Living recipe

April 7, 2014

Alfredo Sauce // Raw, Vegan


Creamy Alfredo Sauce

2/3 cup almond milk
1/3 cup walnut pieces
1/4 cup almond meal
3 tablespoons olive oil
3 - 4 tablespoons fresh lemon juice
1 - 2 tablespoons nutritional yeast
salt & pepper, to taste
Sprig rosemary, chopped fine
Garlic and onion powders, to taste

First, blend milk & walnuts on high, then add the almond meal; blend to combine. The mixture will be quite thick at this point. With blender running on low, add the rest of the ingredients, one by one.
Taste and adjust seasonings, if needed. This takes more pepper, and less salt, than expected.  
The nutritional yeast can get too strong, so add carefully.
Lemon juice is an absolute must - lending the required tanginess without overpowering, as vinegar does.


If sauce is too thick, add more almond milk and blend to thin it.

Important:
don't toss this with hot noodles; the heat will cause the sauce to "curdle".
It won't be smooth and  silky like alfredo sauce should be; it'll still taste good, however.

Garnish with lemon thyme - delicious!
Lemon zest would be a good addition to the sauce, as would most any herb. 
This, on sauteed mushrooms? It'd be amazing!

This would also make an excellent salad dressing.
It's just an added bonus that it's raw, vegan, and actually GOOD for you!

Inspired by a recipe in the April 2014 issue of Taste for Life